HOW TO INSTALL A FAN IN VINTAGE FENDER AMPS
Update! New pictures!Why ?
When vintage Fender amps were designed, there were no small, silent cooling fans available. Heavy duty use as is usual today was also not a design goal then, so some amps can run very hot during extended use. While this does not directly harm the amp, the lifetime of some of its components may be affected. Especially amplifiers tilted using the tilt back legs some amps are equipped with, can build up heat under the chassis. It is really a cool idea to run a small, silent DC fan inside the cabinet.
Requirements
It is absolutely essential that you realize tube amps work with dangerous voltages inside, possibly present even if the amp has been off for some time. Before you do anything inside use a meter to check whether any voltages are present in the amplifier. Some soldering experience is also required to make this "mod".
Which fan ?
A brushless DC fan for 12 volts with low power consumption as used in computer equipment is ideal for this purpose. Choose a light one using less than 100mA current (equivalent about 1W power). You don't want to carry around additional weight, and you don't want to hear the fan running.
How to supply ?
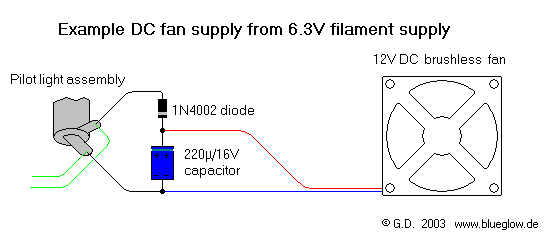
The fan can be supplied using the amplifier's AC filament supply. As these DC fans all have an internal rectifier it is not even necessary to use a DC supply. Also it is not necessary that the fan runs at its design speed, a light air movement that can be felt by the hand is sufficient to prevent a heat buildup in the amp. Some fans will not get enough power to run properly, so an additional recifier diode and filter capacitor is required. Don't worry the fan would stress the power transformer: compared to the filament current of several amperes the few mA the fan consumes is negligible. If with the filament supply AC the fan will not rotate fast enough for that, or not run at all, install a rectifier diode with one leg to the green filament supply wires at the pilot lamp. Install a 100µ/16V to 470µF/16V electrolytic capacitor from the free end to the other green filament wire terminal of the pilot lamp. If the diode's cathode - marked with a ring - points away from the filament wire, this will be the positive of the fan supply, and the filter cap should have its (+) terminal to this end of the diode, otherwise the other way round. The (+) and (-) terminals of the capacitor are the (+) and (-) supplies for the fan (most fans have a red wire for (+) and a black or blue one for (-) of their supply. The fan supply wires can then be lead through the rubber grommet where the output transformer wires go through. See figure for a sample installation.
Where to mount the fan
The best position for the fan is so that it blows air away from the hottest point in the amp, which is the area around the power tubes and the rectifier tube if the amp has one. Use a strong enough plastic foil to mount the fan between the baffle board and the transformers. In most Fender amps this foil can be fixed to the chassis using one each of the transformer mounting screws. Cut to shape and along a straight line bend the foil up so that there is a flange where the mounting screws for the fan go through (See figure).
There is no reason to worry about the fan collecting dust inside the electronics, as these vintage chasses are essentially closed, unlike some other manufacturers' ones that have large vent holes where dust could enter.

Final assembly
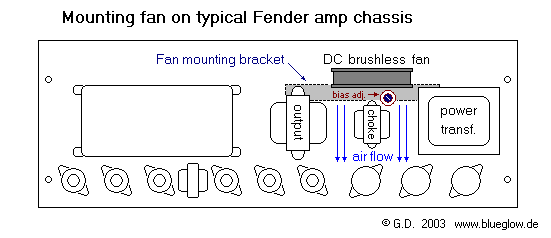
In most Fender amps there is sufficient space to mount the fan between power transformer and output transformer, if you choose a small enough fan. A 60x60mm or 80x80mm is the best size. See figure for sample installation. Some amps will have a bias adjustment pot in this area. If you want to keep this accessible, an additional hole in the fan mounting bracket may be required.
Examples
These pictures show some examples of the final installation.

Fan mounted in vintage Princeton Reverb. This has been used for three years now with no dust collecting inside the chassis.
Here is a sample installation in a vintage Deluxe Reverb, showing both the neatly done wiring inside the chassis as well as the fan mounting with the bias adjust pot still accessible.

Two twisted, bright green wires go from the pilot light's terminals to a terminal strip with three lugs, where the rectifier diode and the load capacitor are mounted. Directly from here the red and blue fan supply wires go through a grommet to the outside.

A nicely done mounting of the fan behind the choke. The mounting bracket has a hole to give access to the bias adjust pot in front of the fan. This amp smokes (figuratively spoken!) it remains wonderfully cool, never gets hot only very warm.
© G.D. 2003...2004 www.blueglow.de